Carambola powered quadcoper
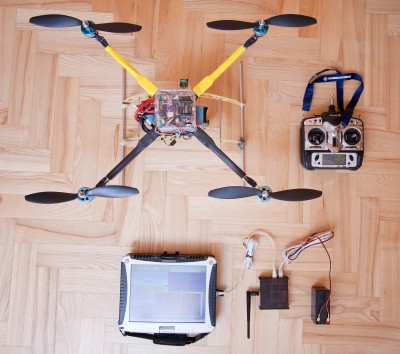 This post is about using Carambola with Arducotper to get live telemetry data from quadcopter.
Carambola is low cost, open-source WiFi (21.5 dB / 2.4GHz) embeddable platform from 8devices. I have decided to use this board to control arducopter from computer. In order to have reliable link I have used two Carambolas. One as AP (on the quadcopter) other as Client (ground station). Mission planner connects to arducopter via bridge created by these boards.
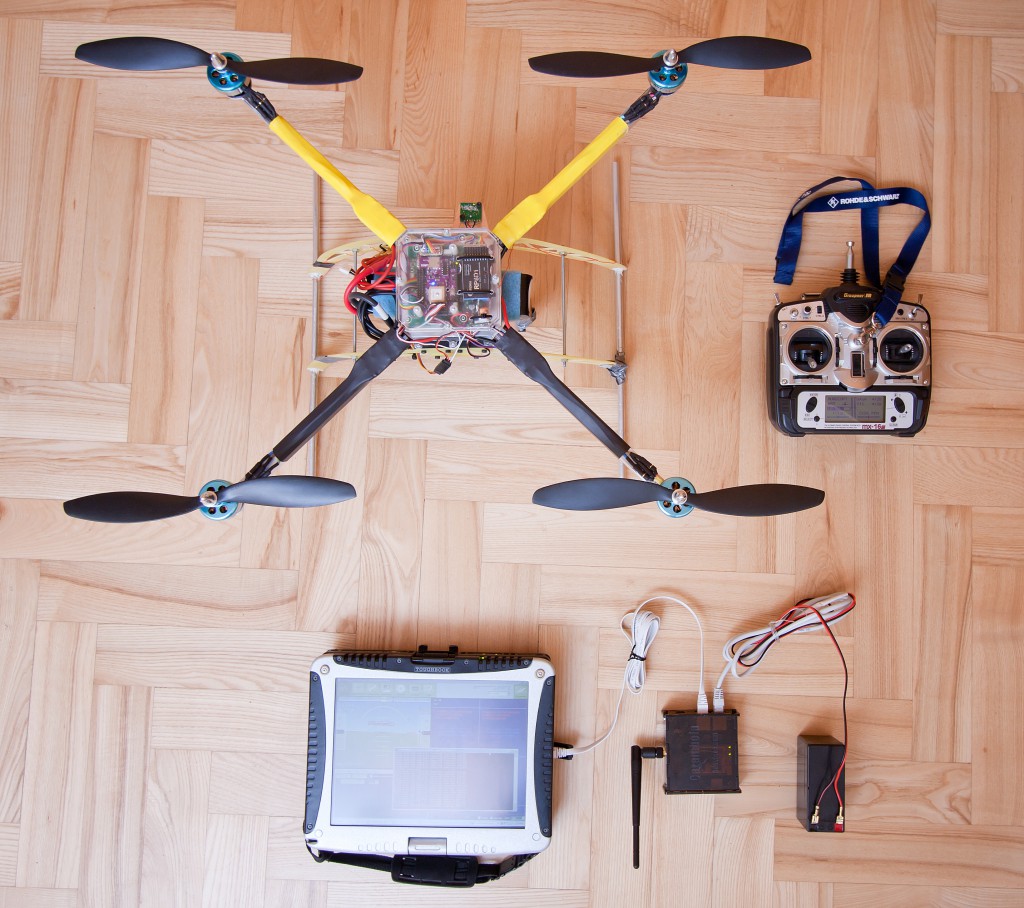
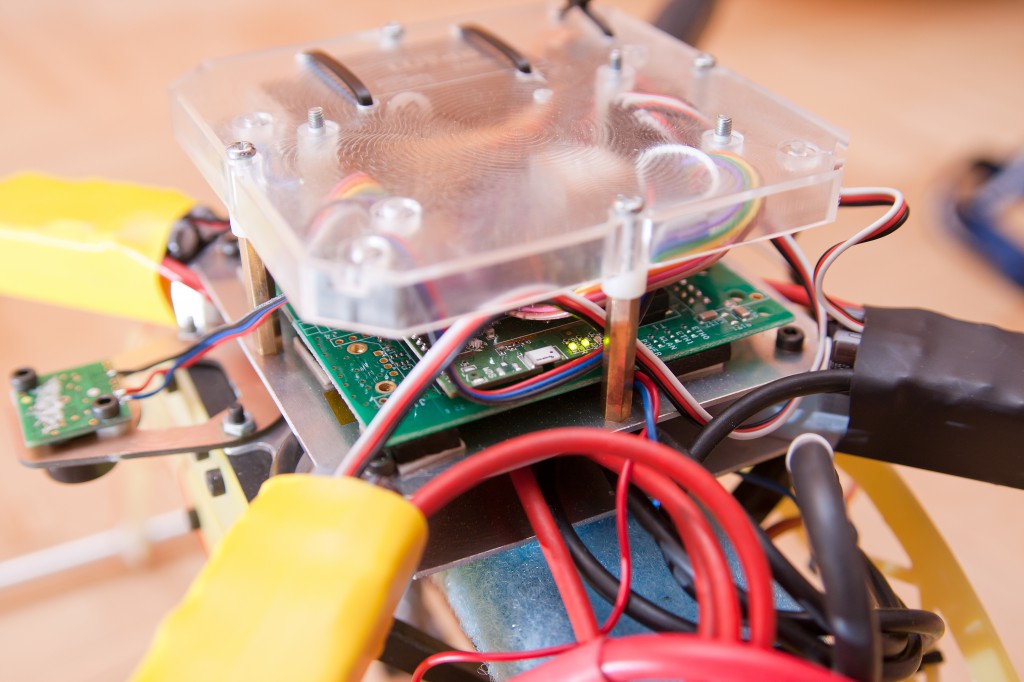
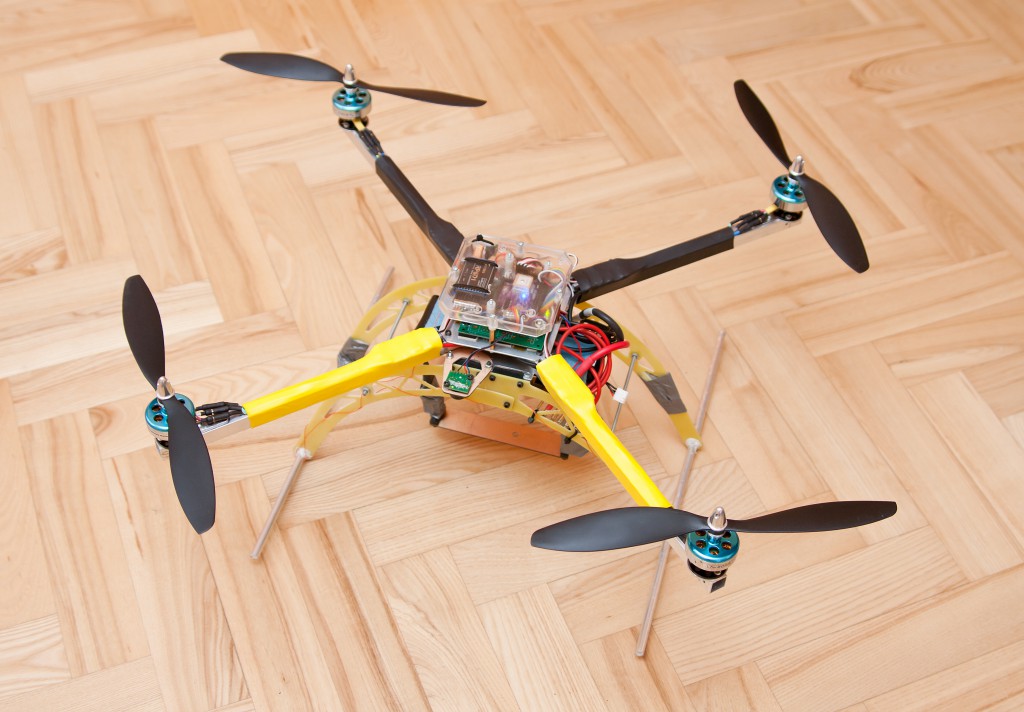
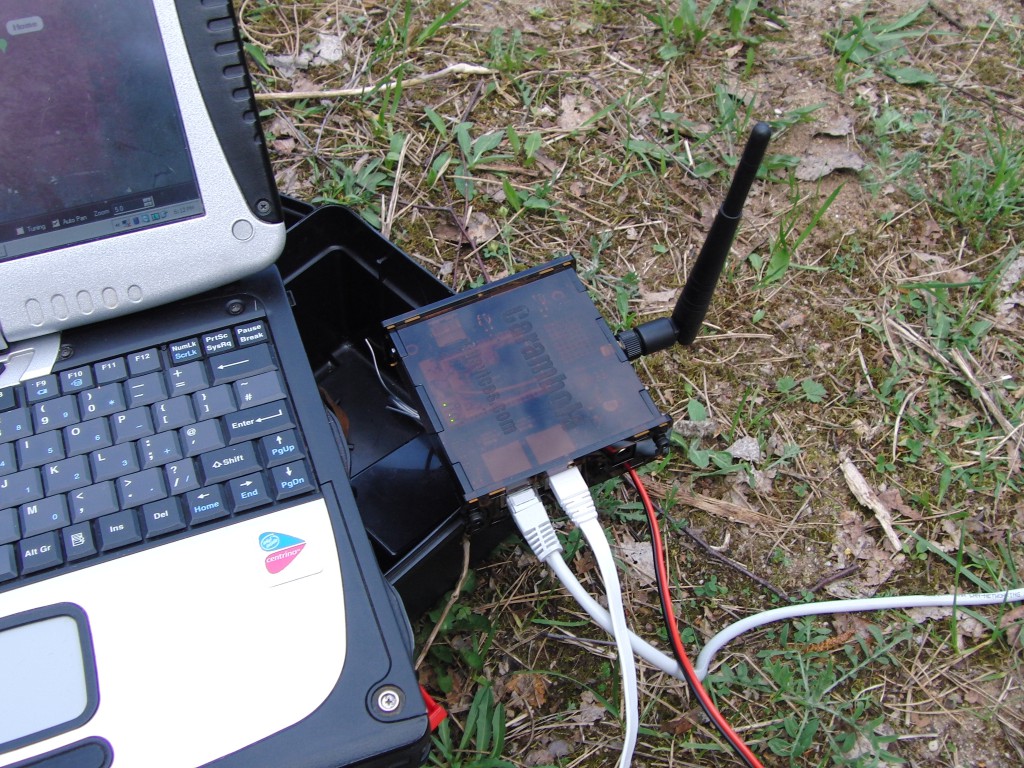
Preflight photos
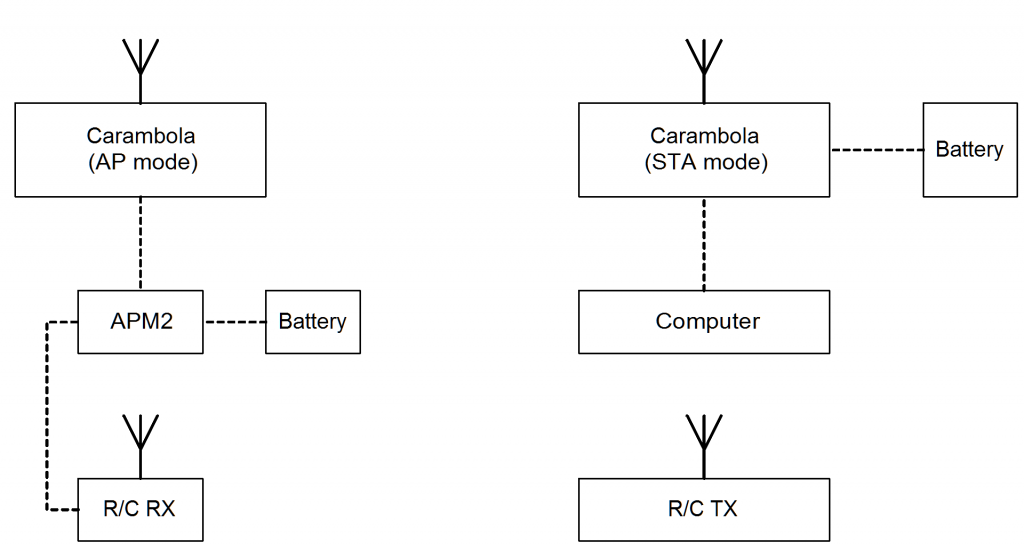
Current connection - Arducopter <-> Carambola <-> Carambola <-> PC
Using this link you can control your SUV (Small Unmanned Vehicle) via joystick from computer and get video from USB webcam. More details are provided at 8devices wiki.
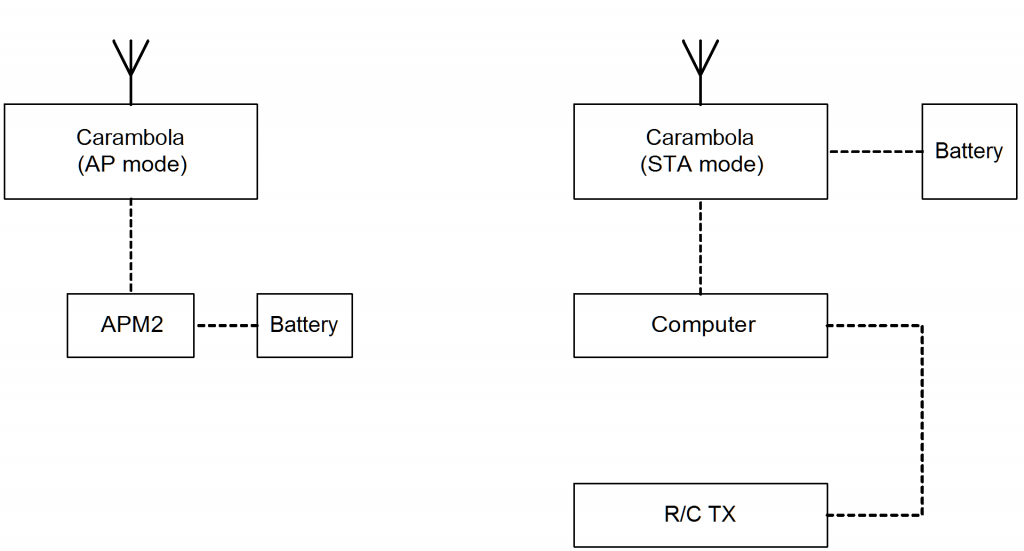
Possible way to get rid of R/C RX-TX
Finally – field tests!
In a following video I have combined Arducopter Ground Station flight data, video from the ground and video from the air (FPV). Also there are two audio tracks – one from ground station camera, other from quadcopter. View this video in HD!
Configuring telemetry
More details on how to deal with Carambola can be found at 8devices website. I will provide only config files and commands to run below. If you have any questions, please ask. I will try to help.
Ground station (STA mode)
Edit network settings
root@OpenWrt:/# cat /etc/config/network
config 'interface' 'loopback'
        option 'ifname' 'lo'
        option 'proto' 'static'
        option 'ipaddr' '127.0.0.1'
        option 'netmask' '255.0.0.0'

config 'interface' 'lan'
        option 'ifname' 'eth0.1 eth0.2'
        option 'type' 'bridge'
        option 'proto' 'dhcp'
        #option ipaddr   192.168.7.1
        #option netmask  255.255.255.0
        #option defaultroute 1

config 'interface' 'wwan'
        option 'proto' 'static'
        option ipaddr   192.168.6.5
        option netmask  255.255.255.0

config 'interface' 'stabridge'
        option 'proto' 'relay'
        option 'network' 'lan wwan'
Prepare radio configuration
Remove wireless config and create fresh one.
rm /etc/config/wireless
wifi detect > /etc/config/wireless
Edit wireless settings
In general ad-hoc might work, but in this case I will use AP-STA mode. Don’tt forget to change MAC address if you are configuring Carambola’s copy-paste way.
root@OpenWrt:/# cat /etc/config/wireless
config wifi-device  radio0
        option type     mac80211
        option channel  11
        option macaddr  00:0c:43:30:54:88
        option hwmode   11ng
        option htmode   HT20
        list ht_capab   GF
        list ht_capab   SHORT-GI-20
        list ht_capab   SHORT-GI-40
        list ht_capab   TX-STBC
        list ht_capab   RX-STBC12
        # REMOVE THIS LINE TO ENABLE WIFI:
        # option disabled 1

config wifi-iface
        option device   radio0
        option network  wwan
        option mode     sta
        option ssid     quadro
        option encryption psk2
        option key aaaaaaaa
Edit DHCP settings
root@OpenWrt:/# cat /etc/config/dhcp
config 'dnsmasq'
        option 'domainneeded' '1'
        option 'boguspriv' '1'
        option 'filterwin2k' '0'
        option 'localise_queries' '1'
        option 'rebind_protection' '1'
        option 'rebind_localhost' '1'
        option 'local' '/lan/'
        option 'domain' 'lan'
        option 'expandhosts' '1'
        option 'nonegcache' '0'
        option 'authoritative' '1'
        option 'readethers' '1'
        option 'leasefile' '/tmp/dhcp.leases'
        option 'resolvfile' '/tmp/resolv.conf.auto'

config 'dhcp' 'lan'
        option 'interface' 'lan'
        option 'start' '100'
        option 'limit' '150'
        option 'leasetime' '12h'
        option 'ignore' '1'

config 'dhcp' 'wan'
        option 'interface' 'wan'
        option 'ignore' '1'
Edit opkg settings to fix weird package source issue
If you are not using latest sources to build firmware, or using old firmware (but fresh config files… strange) you might wish to use openwrt package repository instead of 8devices. In normal conditions you don’t need to do this.
root@OpenWrt:/# cat /etc/opkg.conf
#src/gz snapshots http://pkg.8devices.com/carambola/packages
src/gz snapshots http://downloads.openwrt.org/snapshots/trunk/ramips/packages
dest root /
dest ram /tmp
lists_dir ext /var/opkg-lists
option overlay_root /overlay
Install relayd
I should test if it works without relayd.
root@OpenWrt:/# opkg update
root@OpenWrt:/# opkg install relayd
Remove firewall
I spent half a day figuring out how to fix link issues. After wise guy advised removing firewall (which in our case is useless) link started to work as expected.
opkg remove firewall
Quadcopter (AP mode)
Edit network settings
root@OpenWrt:/# cat /etc/config/network
config 'interface' 'loopback'
        option 'ifname' 'lo'
        option 'proto' 'static'
        option 'ipaddr' '127.0.0.1'
        option 'netmask' '255.0.0.0'

config 'interface' 'lan'
        option 'ifname' 'eth0.1 eth0.2'
        #option 'ifname' 'eth0.1 eth0.2'
        option 'type' 'bridge'
        option 'proto' 'dhcp'
        option 'ipaddr' '192.168.6.2'
        option 'netmask' '255.255.255.0'

config interface wifi
        option 'proto'      'static'
        option 'ipaddr'     '192.168.6.6'
        option 'netmask'    '255.255.255.0'
        option defaultroute 1
Enable ttyS0
Make pins used for other serial port dedicated for UART not GPIO.
root@OpenWrt:/# cd /usr/sbin
root@OpenWrt:/usr/sbin# wget http://www.8devices.com/files/mmio
root@OpenWrt:/usr/sbin# chmod 777 mmio
Disable console on ttyS0
root@OpenWrt:/# cat /etc/inittab
::sysinit:/etc/init.d/rcS S boot
::shutdown:/etc/init.d/rcS K shutdown
#ttyS0::askfirst:/bin/ash --login
ttyS1::askfirst:/bin/ash --login
Edit opkg settings to fix weird package source issue
root@OpenWrt:/# cat /etc/opkg.conf
#src/gz snapshots http://pkg.8devices.com/carambola/packages
src/gz snapshots http://downloads.openwrt.org/snapshots/trunk/ramips/packages
dest root /
dest ram /tmp
lists_dir ext /var/opkg-lists
option overlay_root /overlay
Install ser2net
This program is acting as bridge between serial port and ethernet. It is not perfect, but does great job. In order to build more reliable link you should use UDP bridge.
root@OpenWrt:/usr/sbin# opkg update
root@OpenWrt:/usr/sbin# opkg install ser2net
Put everything in autorun
At first set pins as serial port, then start ser2net bridge.
root@OpenWrt:/# cat /etc/rc.local
# Put your custom commands here that should be executed once
# the system init finished. By default this file does nothing.
mmio 0x10000060 0x01
ser2net
exit 0
Prepare radio configuration
root@OpenWrt:/usr/sbin#rm /etc/config/wireless
root@OpenWrt:/usr/sbin#wifi detect > /etc/config/wireless
Edit wireless settings
root@OpenWrt:/# cat /etc/config/wireless
config wifi-device  radio0
        option type     mac80211
        option channel  11
        option macaddr  c4:93:00:11:04:90
        option hwmode   11ng
        option htmode   HT20
        list ht_capab   GF
        list ht_capab   SHORT-GI-20
        list ht_capab   SHORT-GI-40
        list ht_capab   RX-STBC1
        # REMOVE THIS LINE TO ENABLE WIFI:
        # option disabled 1

config wifi-iface
        option device   radio0
        option network  wifi
        option mode     ap
        option ssid     quadro
        option encryption psk2
        option key aaaaaaaa
Edit network settings
root@OpenWrt:/# cat /etc/config/network
config 'interface' 'loopback'
        option 'ifname' 'lo'
        option 'proto' 'static'
        option 'ipaddr' '127.0.0.1'
        option 'netmask' '255.0.0.0'

config 'interface' 'lan'
        option 'ifname' 'eth0.1 eth0.2'
        #option 'ifname' 'eth0.1 eth0.2'
        option 'type' 'bridge'
        option 'proto' 'dhcp'
        option 'ipaddr' '192.168.6.2'
        option 'netmask' '255.255.255.0'

config interface wifi
        option 'proto'      'static'
        option 'ipaddr'     '192.168.6.6'
        option 'netmask'    '255.255.255.0'
        option defaultroute 1
Edit DHCP settings
root@OpenWrt:/# cat /etc/config/dhcp
config dnsmasq
        option domainneeded     1
        option boguspriv        1
        option filterwin2k      0  # enable for dial on demand
        option localise_queries 1
        option rebind_protection 1  # disable if upstream must serve RFC1918 addresses
        option rebind_localhost 1  # enable for RBL checking and similar services
        #list rebind_domain example.lan  # whitelist RFC1918 responses for domains
        option local    '/lan/'
        option domain   'lan'
        option expandhosts      1
        option nonegcache       0
        option authoritative    1
        option readethers       1
        option leasefile        '/tmp/dhcp.leases'
        option resolvfile       '/tmp/resolv.conf.auto'
        #list server            '/mycompany.local/1.2.3.4'
        #option nonwildcard     1
        #list interface         br-lan
        #list notinterface      lo
        #list bogusnxdomain     '64.94.110.11'

config dhcp lan
        option interface        lan
        option start    100
        option limit    150
        option leasetime        12h

config dhcp wan
        option interface        wan
        option ignore   1

config 'dhcp' 'wifi'
        option 'interface'  'wifi'
        option 'start'      '100'
        option 'limit'      '150'
        option 'leasetime'  '12h'
Remove firewall
opkg remove firewall
Edit ser2net settings
These settings can be tuned, but I have just added last line to route data from ttyS0 57600 bps to LAN:2002 port.
root@OpenWrt:/# cat /etc/ser2net.conf
#
# This is an example configuration file for ser2net.  It has the following
# format:
#  <TCP port>:<state>:<timeout>:<device>:<options>
#     TCP port
#            Name   or  number of the TCP/IP port to accept con-
#            nections from for this device.  A port number may
#            be of the form [host,]port, such as 127.0.0.1,2000
#            or localhost,2000.  If this is specified, it will
#            only bind to the IP address specified. Otherwise
#            it will bind to all the ports on the machine.
#
#     state  Either raw or rawlp or telnet or off.  off disables
#            the  port  from  accepting  connections.  It can be
#            turned on later from the control port.  raw enables
#            the port and  transfers  all data as-is between the
#            port  and  the long.  rawlp  enables  the port  and
#            transfers  all input data to device, device is open
#            without  any  termios  setting.  It  allow  to  use
#            /dev/lpX  devices  and  printers connected to them.
#            telnet enables the port and runs the telnet  proto-
#            col  on the port to set up telnet parameters.  This
#            is most useful for using telnet.
#
#     timeout
#            The time (in seconds) before the port will be  dis-
#            connected  if  there  is no activity on it.  A zero
#            value disables this function.
#
#     device The  name  of  the  device   to  connect  to.  This
#            must be in the form of /dev/<device>.
#
#     options
#            Sets  operational  parameters  for the serial port.
#            Options 300, 1200, 2400, 4800, 9600, 19200, 38400,
#            57600, 115200 set the various baud rates.  EVEN,
#            ODD, NONE set the parity.  1STOPBIT, 2STOPBITS set
#            the number of stop bits.  7DATABITS, 8DATABITS set
#            the number of data bits.  [-]XONXOFF turns on (-
#            off) XON/XOFF support.  [-]RTSCTS turns on (- off)
#            hardware flow control, [-]LOCAL turns off (- on)
#            monitoring of the modem lines, and
#            [-]HANGUP_WHEN_DONE turns on (- off) lowering the
#            modem control lines when the connection is done.
#            NOBREAK disables automatic setting of the break
#            setting of the serial port.
#            The "remctl" option allow remote control (ala RFC
#            2217) of serial-port configuration.  A banner name
#            may also be specified, that banner will be printed
#            for the line.  If no banner is given, then no
#            banner is printed.
#            The tw, tr, and tb options take a tracefile name (
#            specified in TRACEFILE that will take all traced data.
#            tw is data written to the device, tr is data read from
#            the device, and tb is both.
#
# or...

#  BANNER:<banner name>:banner
#    This will create a banner, if the banner name is given in the
#    options of a line, that banner will be printed.  This takes the
#    standard "C" \x characters (\r is carraige return, \n is newline,
#    etc.).  It also accepts \d, which prints the device name, \p,
#    which prints the TCP port number, and \s which prints the serial
#    parameters (eg 9600N81).  Banners can span lines if the last
#    character on a line is '\'.  Note that you *must* use \r\n to
#    start a new line.
#
#  TRACEFILE:<name>:filename
#    This specifies a filename to trace output into, as tw:/tmp/trace1.
#    This takes a large number of escape sequences, see the man page
#    for details on these options.
#
# Note that the same device can be listed multiple times under different
# ports, this allows the same serial port to have both telnet and raw
# protocols.

BANNER:banner1:Welcome to ser2net TCP port \p device \d\r\n\
second line \
third line\r\n

BANNER:banner2:this is ser2net TCP port \p device \d\r\n\
second line \
third line\r\n

BANNER:banner3:this is ser2net TCP port \p device \d  serial parms \s\r\n

TRACEFILE:tw1:/tmp/tw-\p-\Y-\M-\D-\H:\i:\s.\U
TRACEFILE:tr1:/tmp/tr-\p-\Y-\M-\D-\H:\i:\s.\U

#2001:raw:600:/dev/ttyS0:9600 NONE 1STOPBIT 8DATABITS XONXOFF LOCAL -RTSCTS
#2002:raw:600:/dev/ttyS1:9600 NONE 1STOPBIT 8DATABITS XONXOFF LOCAL -RTSCTS
#2003:raw:5:/dev/ttyS2:9600
#2004:raw:5:/dev/ttyS3:115200
#2005:raw:5:/dev/ttyS4:9600
#2006:raw:5:/dev/ttyS5:9600
#2007:raw:5:/dev/ttyS6:9600 tw=tw1 tr=tr1
#3001:telnet:0:/dev/ttyS0:19200 remctl banner1
#3011:telnet:3:/dev/ttyS0:19200 banner2
#3002:telnet:0:/dev/ttyS1:9600
#3003:telnet:0:/dev/ttyS2:9600 banner3
#3004:telnet:0:/dev/ttyS3:115200
#3005:telnet:0:/dev/ttyS4:9600
#3006:telnet:0:/dev/ttyS5:9600
#3007:telnet:0:/dev/ttyS6:9600
#5001:rawlp:10:/dev/lp0
2002:raw:600:/dev/ttyS0:57600
Testing
If you have set-up everything correctly (APM2 ↔ Carambola1 ↔ WiFi ↔ Carambola2 ↔ LAN ↔ PC ) you should be able to ping from PC to Carambola on quadcopter.
root@OpenWrt:/# ping 192.168.6.6
PING 192.168.6.6 (192.168.6.6): 56 data bytes
64 bytes from 192.168.6.6: seq=0 ttl=64 time=0.731 ms
64 bytes from 192.168.6.6: seq=1 ttl=64 time=0.531 ms
64 bytes from 192.168.6.6: seq=2 ttl=64 time=0.462 ms
If you have connection, you can connect ardupilot board with Mission Planner.
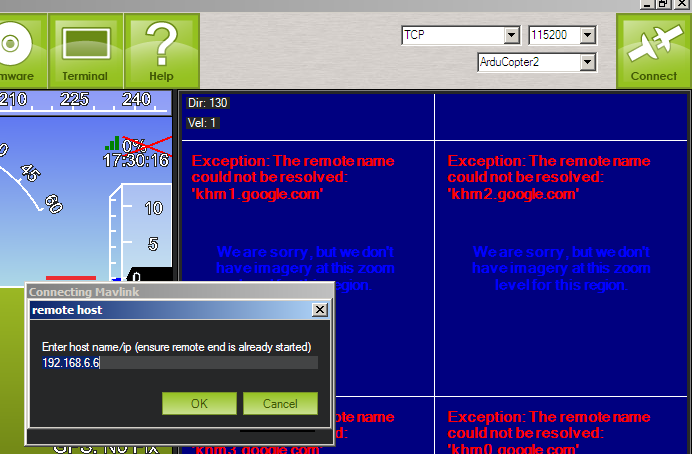
Select "TCP" connection and click "Connect". Enter 192.168.6.6 when prompted to enter IP address.

Remote port is 2002 as configured in ser2net.conf

Connected!
You can see more details about building this quadcopter in previous posts. Sorry other posts are in Lithuanian language, but you can read translated version.


why did u use the second Carambola device as ground station? I guess ur laptop’s internal Wi-Fi would act as the same, right?
best regards,
tufan
Tufan, Sure you can use internal laptops WiFi, but Carambola has more powerful radio and you can connect external antenna, which means greater distance.
Alternative:
Approach – 1:
If you open up your Laptop, you will find a Wi-Fi module, which has hot UFL antenna port.
With a UFL to SMA, you can connect this port to an external Wi-Fi amplifier may be 1Watt available in 50US$ at DIY Drones store, and achieve much much longer range.
Approach-2:
Put a regular Wi-Fi router nearby, this Wi-Fi router generally have SMA antenna port, and you can hook 1Watt Wi-Fi amplifier as said above and get the same thing but in this case, you can get rid of opening your Laptop.
I my self opted for Approach 1
Rana, what distance can you cover with 1W amplifier? Does it work in MIMO mode?
great job…
I agree with tufan, i think for greater distance you can use external wifi device such as ubiquity bullet radio, it support mimo (mimo capable) and power to 1 watt.
impressive project you got here :)
can you give me some tips or details about how you build the telemetry GUI.
i tried to implement a similar software but couldn’t find the right controls for the telemetry data (niddel gauge, signal graph, video display etc..).
thanks, axodus.
@axodus GUI was written by Ardupilot team. I have implemented telemetry over LAN/WiFi and tested in the field.
@moshack If to talk about long range… go for ligowave products. Check this blog http://blog.ligowave.com/. It can easily reach 10 km with stock antenna.
Excellent! Thank you for posting this! I have been looking for people playing with the Carambola. I would like to grab a couple for projects of my own. Looks like its probably time!
May I suggest using semi-stationary blimps as repeaters for long-distance applications?
@emre good idea :)
@dext0rb please let me know if you make something interesting!
Excellent job!
You’re project is amazing and give real ideas!
(Are you by any way affiliate to the LT compagny 8devices? :)
Anyway keep up the nice work!
i sveikata!
@Anthony , thanks :) Yes, I am in some way connected to 8devices :)
Very cool project!
Did you modify the the ArduCopter firmware to use the Ethernet library instead of FastSerial, or did you connect the APM2 UART directly to the Carambola?
I ask because I am working on something similar: video, telemetry, and control all over wifi. My approach is to connect an SPI to Ethernet converter to the APM2 and modify the autopilot’s firmware to send and receive telemetry/control using the Ethernet library.
I have connected APM2 directly to Carambola.
Thanks! Your way is far more graceful than what I was attempting.
You mentioned something about a UDP bridge:
“Install ser2net
This program is acting as bridge between serial port and ethernet. It is not perfect, but does great job. In order to build more reliable link you should use UDP bridge.”
Could you provide any information about this? I like the idea of using UDP for this instead of TCP.
Cody, I was planing on rewriting (to be exact, writing my own) lan to serial gateway which would work on UDP layer. Basically it is pretty simple, just might take some time to make it work reliably. If you wish to code this gateway by yourself, there are many examples on internet how to deal with UDP packets and serial ports.
Hi Saulius,
Very good job.
I have a question about the connection of Ardupilot and Carambola at the quadricopter.
Did you connect they directly or did you used the development board?
Thank you! I have used stripped development board.
Hi Saulius Lukšė
Thanks for this blog!
Could you please give a little more details about how you connected the Carambola to the ArduPilot Mega?
Connect serial cable (RX/TX/GND) directly to any telemetry port and set baudrate in APM to 115200. I do not have pinout at this moment.
wonderful details on wifi.
can a quadricopter be built for carrying 10-20 kg payload?
I want to build one for spraying pesticide on my crops.
Certainly it can! Just from my point of view you need plane instead of vertical landing air vehicle.
Hi! I tried to follow your instructions and now I can’t get it connected with my pc. Do you have any suggestions in order to get them to communicate again so I can flash the stock firmware again? Thanks in advance ;)
Hi, please let me know at which step it went wrong?
Well, right now I’m just trying to connect it directly to my computer through Ethernet cable so I can flash a new image with sysupdate. I’ve tried the basic configurations that I found on Carambola Wiki, but so far no luck :(. Any ideas?
Do you have access via serial port? Do you use Carambola1 or 2?
I have access via serial port and that’s the only way I can access it right now. I’m using Carambola 1.
1. Show me “ifconfig” output
2. Show me “cat /etc/config/network” content
http://pastebin.com/YQZsKjZm
and thank you so much for taking the time.
One more question did you tried plugging RJ45 cable to another socket?
Both Carambola sockets yeah. On my PC I only have one though. I tried connecting Carambola to my router so I could be in the same LAN as my PC, but ifconfig shows the same.
Do you have DHCP enabled? If not, try setting static IP address.
Yes, DHCP is enabled. I tried to set a static IP just in case.
http://pastebin.com/qZ5pjmCH
I believe I’m doing it right. Default gateway’s IP was 192.168.1.1.
I couldn’t ping it no matter what.
Kind of strange. Maybe LAN cable is broken? Also you can try setting WIFI in STA mode to connect to wireless router.
Fixed it today. Have no idea how this didn’t work sooner. Flashing with the latest version and following your tutorial once more. Thanks for the help again ;).
Great news, Jamie!
Hello, i think that i saw you visited my site so i came to return the favor.I am trying to find things to enhance my web site!I suppose its ok to use some of your ideas!! dddgkefebe
your work is very nice.
i have connect external antenna to Carambola2, but it can not detect externel antenna, by below command
command: iw list |grep -i antenna
i have this antenna and connector
w5i-bo-07 interface opwnwrt u.f.l
can u solve my problem