
Carambola powered robot v2
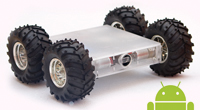 If you were interested in first Carambola based rover, you will love this one. First one was just how to connect and setup everything. This one is actualy usable and fun to use. Purpose of this rover is to replace crappy toy cars and to have more fun. Not fogetting ability to learn and build something new! It even has an Android application.
Goals set for this rover
- Rugged
- Easy to control
- Controllable from Android phone or tablet
- Video streaming
Lets start from fun part
Video and couple of pictures.
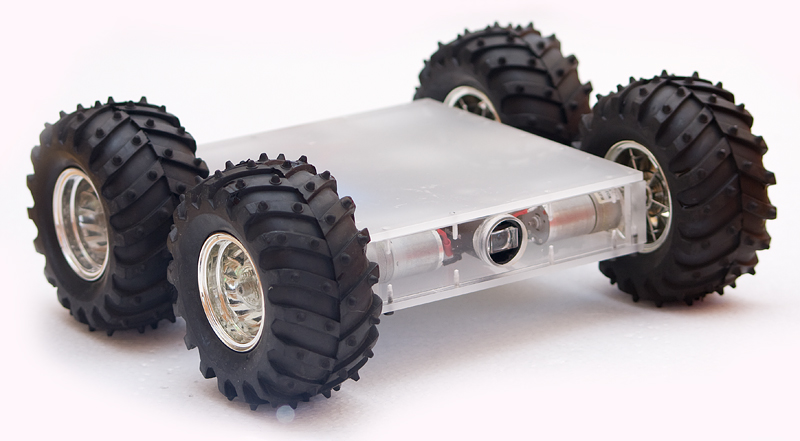
Used parts
- Motors: from ebay (Torque: 130 N*cm, 12V DC, 60RPM, Diameter: 25mm, Length: 72mm, Shaft diameter: 4mm, Weight: 96g)
- Camera: 720p Webcam Microsoft LifeCam Cinema
- Motor controller: Pololu Qik 2s12v10 Dual Serial Motor Controller
- Battery: 3SP1 3Ah LiPo
- Wheels: Dagu Wild Thumper Wheel 120x60mm Pair with 4mm Shaft Adapters
- Chasis: I have chosen to use custom chasis, because it is easier to accomodate all parts the way I like.
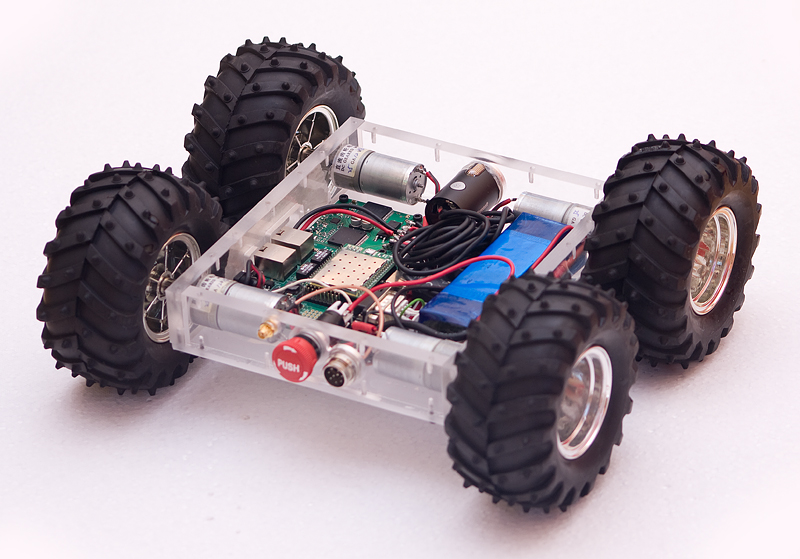
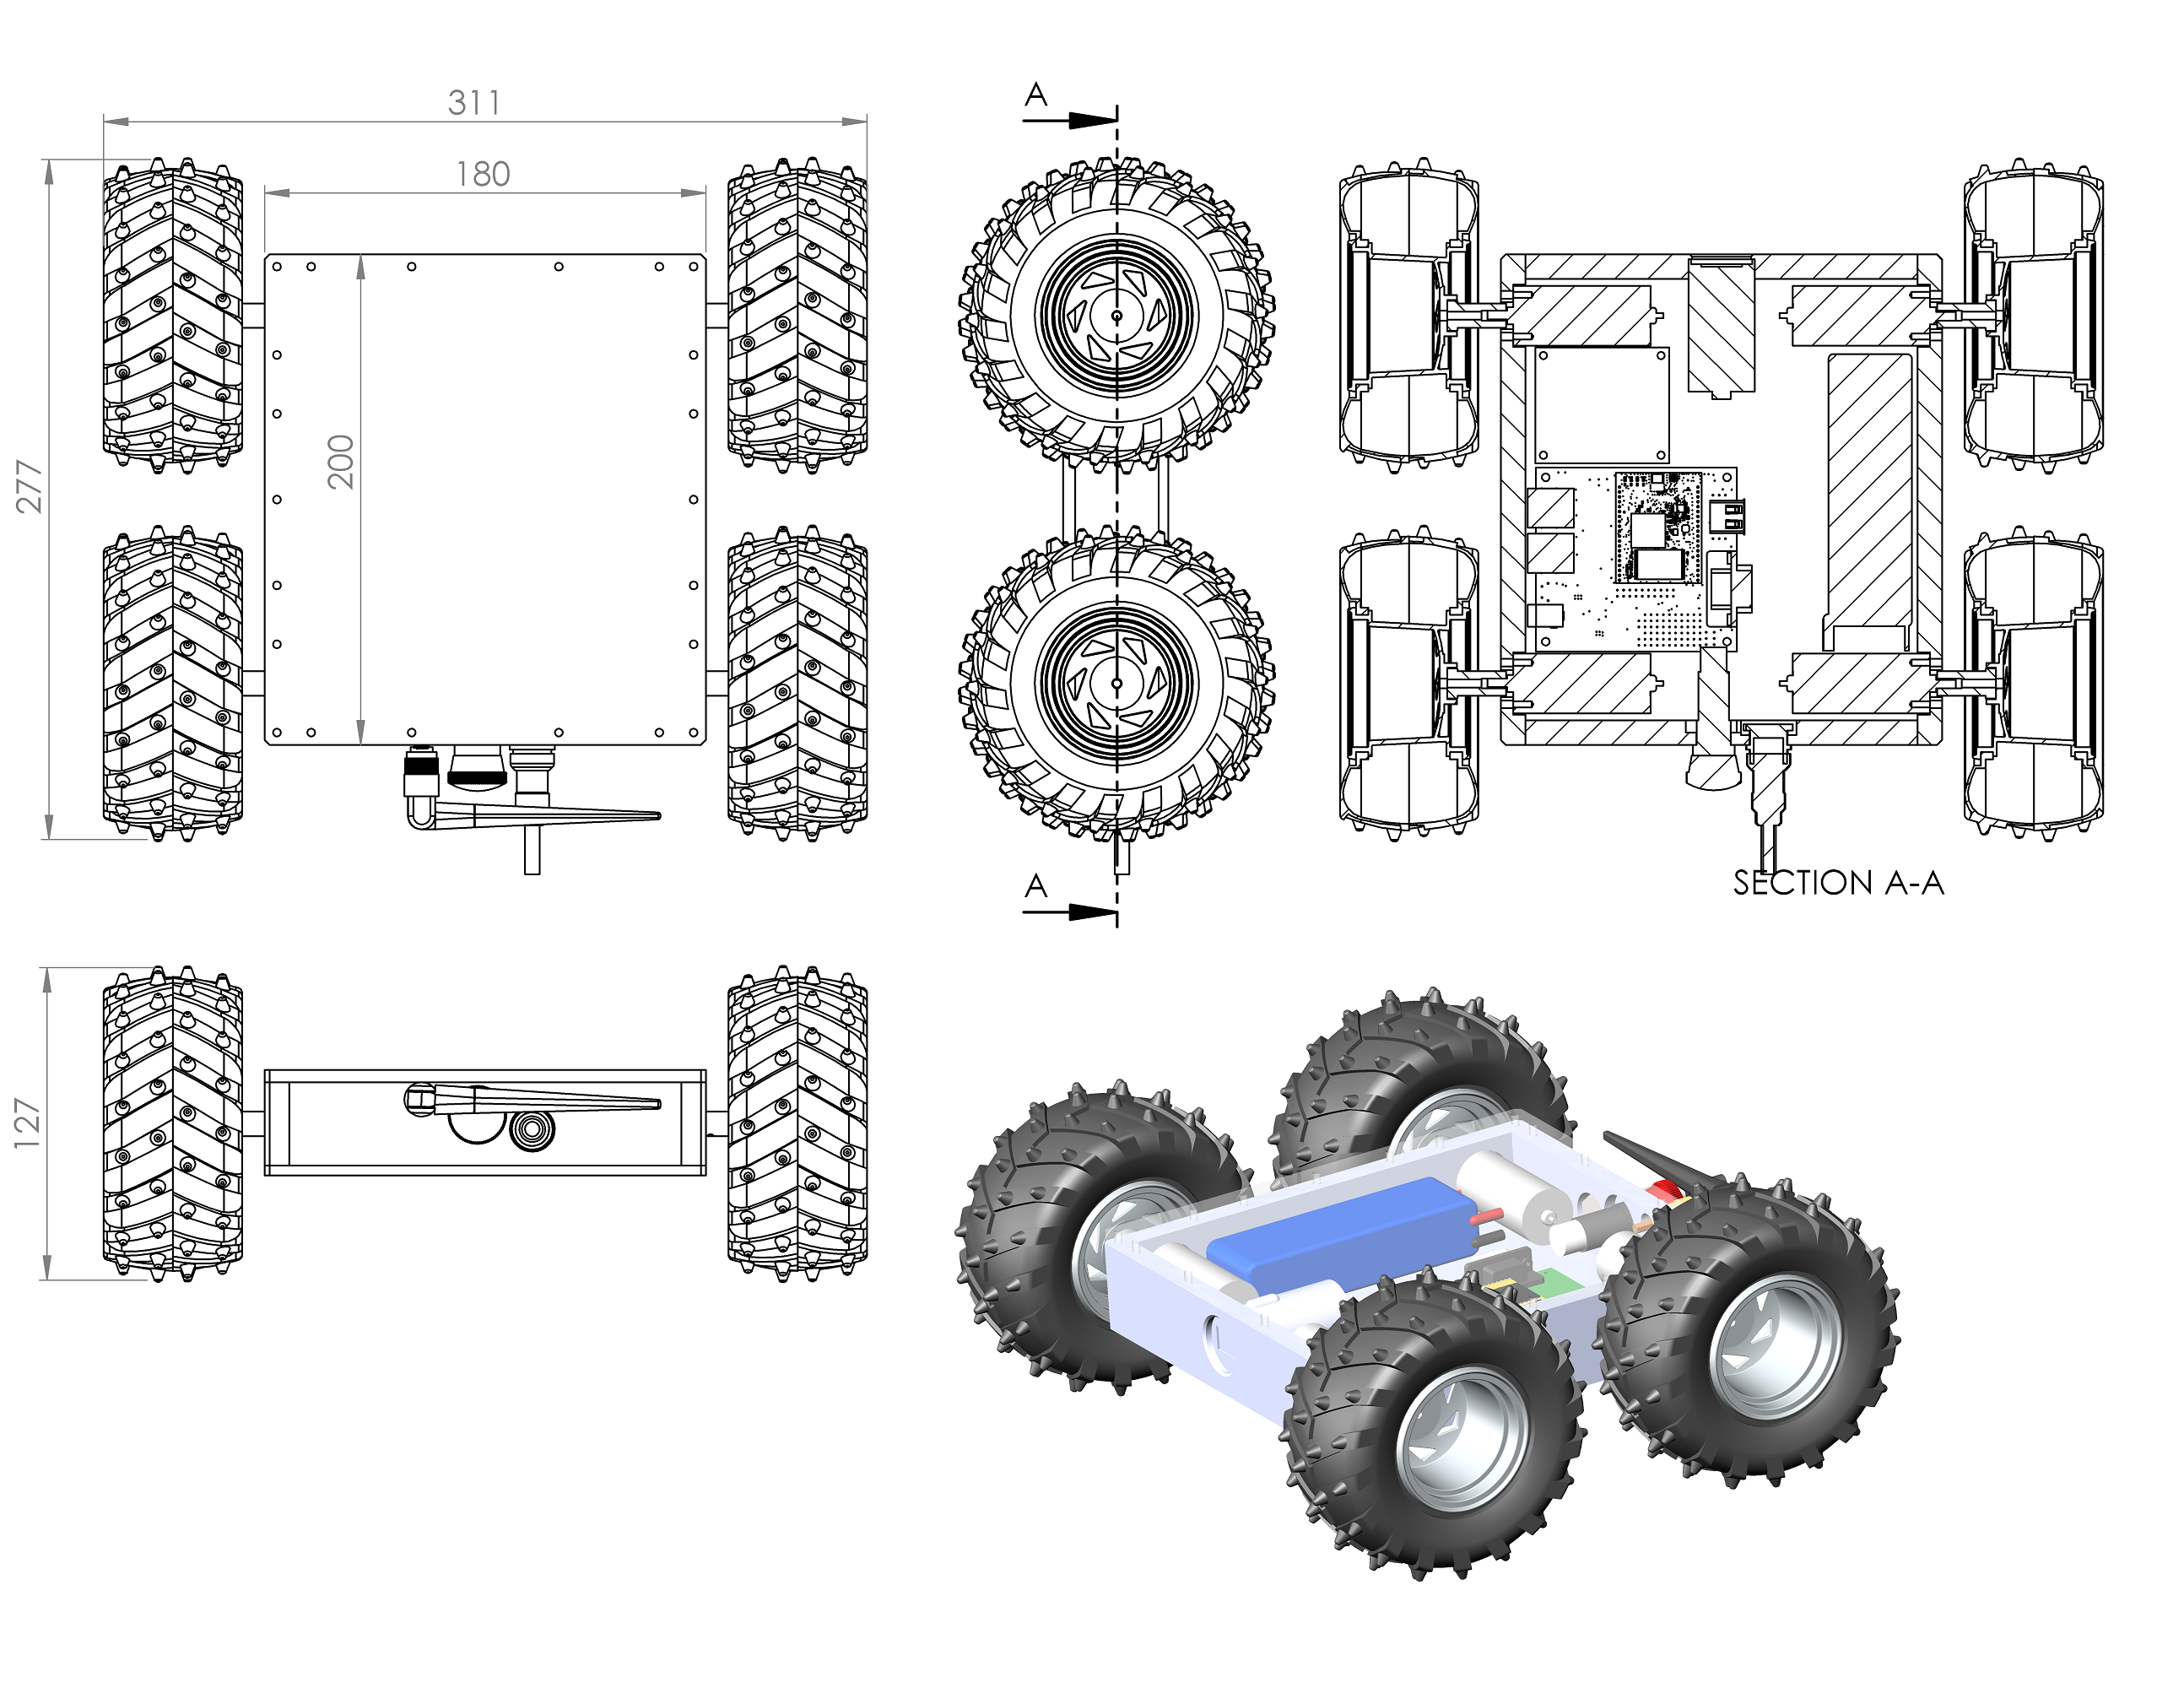
Mechanics
3D (STEP) file of this rover can be found here.
Electronics
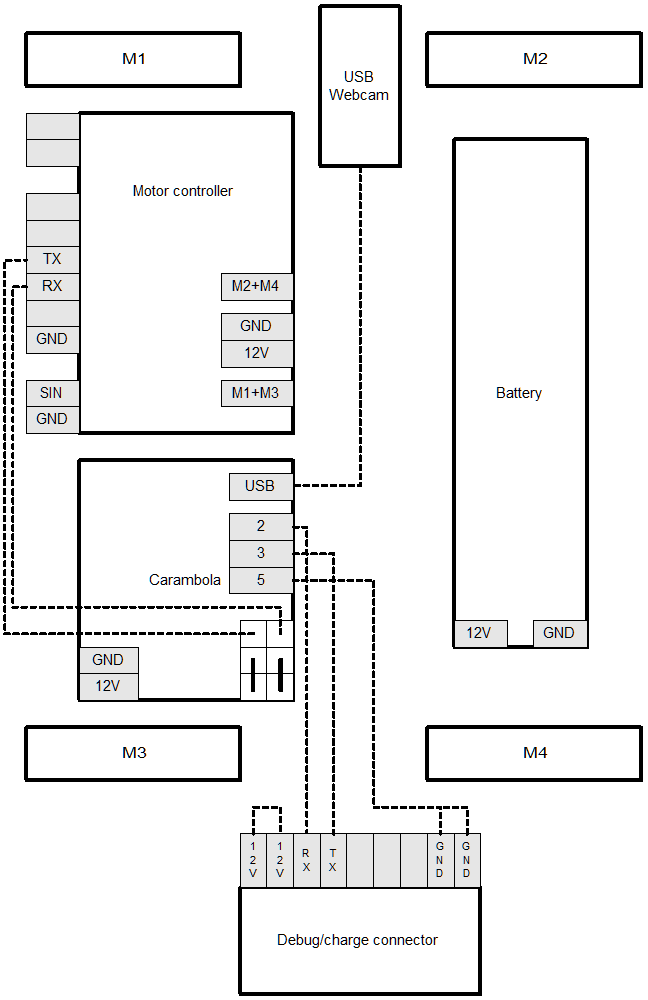
Here is quick sketch how everything is connected.
Carambola setup
Prepare firware
Kernel modules
Video Support
Select all if unsure
flash firmware
scp test@192.168.0.109:/home/test/carambola/bin/ramips/openwrt-ramips-rt305x-carambola-squashfs-sysupgrade.bin /tmp
sysupgrade -v -n /tmp/openwrt-ramips-rt305x-carambola-squashfs-sysupgrade.bin
Setup wireless in AP mode
rm /etc/config/wireless
wifi detect > /etc/config/wireless
vi /etc/config/wireless
vi /etc/config/wireless
config wifi-device radio0
<..>
# option disabled 1
option txpower 20config wifi-iface
option device radio0
option network wwan
option mode ap
option ssid ‘rover’
option encryption psk2
option key ‘rover’
vi /etc/config/network
<…>
config interface ‘lan’
option ifname ‘eth0.1’
option type ‘bridge’
option proto ‘static’
option ipaddr ‘192.168.0.110’
option netmask ‘255.255.255.0’
config interface ‘wwan’
option proto dhcp
Connect to carambola
Enable connection from ssh
passwd root
Install necessary packages
opkg update
opkg install mjpg-streamer
opkg install io
opkg install ser2net
opkg install http://pkg.8devices.com/v2.2/carambola/packages/gpioctl_1.0-1_ramips.ipk
Setup
vi /etc/ser2net.conf
<..>
2002:raw:600:/dev/ttyS0:115200
vi /etc/rc.local
io 0x10000060 0x15
ser2net
exit 0
vi /etc/inittab
root@OpenWrt:/# cat /etc/inittab
::sysinit:/etc/init.d/rcS S boot
::shutdown:/etc/init.d/rcS K shutdown
#ttyS0::askfirst:/bin/ash –login #<————- comment this line to disable console on ttyS0
ttyS1::askfirst:/bin/ash –login
Setup mjpg-streamer
vi /etc/config/mjpg-streamer
config mjpg-streamer core
option device “/dev/video0”
option resolution “400×200”
option fps “25”
option port “8080”
option enabled “true”
Video streaming test
Run from computer (browser or vlc) – you should see video or picture, depending on URL you picked.
http://192.168.0.110:8080/?action=stream
http://192.168.0.110:8080/?action=snapshot
Control mjpg
Start on boot
/etc/init.d/mjpg-streamer enable
Start mjpg-streamer right now
/etc/init.d/mjpg-streamer start
Motor controller setup
I am not really sure what settings I am using (setup was trial and error method). In general you should:
- Enable security timeout for serial comunications (if there are no data more than 0.2s motors will stop)
- Set baud 115200 baud rate with jumpers
- Set acceleration / deceleration and other parameters as you like (chose best settings for your platform)
- More details can be fond here
Android
There are lots of things I stil don’t know about Android. I have been toying with it for a week. This is also my first encounter with coding java. There are key notes about this software.
- Application has no UI customization properties. It just hopes that rover will respond on 192.168.0.110 ip address.
- Program is configured for fixed LCD resolution (1024×768)
- It displays video stream of 200px wide (for better video perfomance)
- To drive forward touch upper LCD part (the higher, the faster). To drive backwards do the opposite.
- To turn, lean tablet or phone left or right.
- Manoeuvrability becomes less responsive the faster you go.
- Exit must be performed hard way – by killing it from task manager.
Android application (and sources) can be found on githuib. (it is derived from some mjpeg streaming software, so beware – name is still the same). Also I should credit authors, but unfortunately I don’t remember where I got this example.
Some ideas for future
- Bigger/faster motors (which ones)
- Wider front camera lens (to be able to see wheels)
- Custom panoramic lens for second camera
- Custom controller
- Integrated charger
- New protocol with discovery
- Accerometer
- Compass
- Current/voltage monitoring
- Head lamps with control
- Arduino for custom functions?
- Switch (debug port) selectable wifi AP/STA mode
- Camera up/down control
- Gripper?
- Autonomic navigation?
- Kinect terain mapping
- Video keeps refocusing. In low light it is confusing. There is utility called uvcdynctrl to control camera parameters. At this moment it is unclear how shoult I port it to Carambola, but it should do the trick.
Hi,
sincerely thanks for this information. I am personnaly interested to also create my own survey robot based on your wireless (tablet/smartphone) control.
But I also need it with other specifications :
1) using track in place of wheels (like this : http://www.instructables.com/id/How-to-make-custom-and-strong-tank-tracks-for-very/?ALLSTEPS)
2) why not putting the camera in a tube that could then rotate allowing us to view up or down. It means (by example) if I drive it under my car I could see what happend under my car.
3) I need to use it in my garden (which is really steep). This is why I need it with tracks in place of wheels. But I also need it as automatic mower. It means even I could drive it (by using my personal smartphone/tablet) or allowing it to work by itself (then will need some limitations (GPS values known as parts of my backyard. Then I could tell it to only mow some parts dependeing of what we need. I though to diveide my backyard in three parts. It will also allowing it to recharge itself before continuing to mow the other part of the backyard.). Then it could be interesting to integrate a central mowing module (axis motor with blade). Based idea using Your carambola robot : http://spt06.chez-alice.fr/01/lawnmower.htm
If we could have an empty central part on your Carambola robot we could then add the explained axis motor that could be activated with the smartphone/tablet. It could be automatically started if somebody take it from the ground (protection system).
4) last but not least : using a solar panel to charge the axial motor independant battery could help us to prevent this motor to stop.
I hope we could see this new version soon.
Have a nice day,
Miguipda ;-)
Miguipda, thank you for suggestions! If you wish you are free to customize my version upon your needs. I think most of information is present, and if I am missing something you can always ask.
Saulius, nice job,,,,where are you located?
Hi Steve, I live in Lithuania.
Dear Saulius Lukšė
sincerely thanks I will save this webpage to be sure to not loosing it.
Then when I will have time (and money ;-) ) I will try to do the idea I told you
Have a nice day,
Miguipda ;-)
Good to hear, Miguipda! Share your results when you have some.
Of course you will be the first to be informed when if I find time (and money) to do it.
Great! :)
hi Saulius Lukšė, very good work,Like it very much, I am currently constructing a similar surveillance robot like this,but my chassis is not strong enough, could you show me in detail ,how to construct your custom chassis(any detailed design files or anything…By the way is that acrylic ?) ( I have less mechanical knowledge and I own a Maisto Rock Crawler for the chassis) ? This would be very helpful…
Hi, Irshad. I have provided full design here: http://lukse.lt/failai/2013-01-19-cara-rover-2/rover_2.zip. Feel free to explore. Material is plexiglas.
@Saulius Lukšė
Thanks Saulius Lukšė
Hello
Can you descibe precisely your Carambola hardware configuration ?
Which cards you are using ?
Thanks a lot
MITCHEL, please ask more specific questions (what do you mean by “cards”). Basically it is Carambola and motor controller.
Hello Saulius Lukšė
Thanks for your quick response
When i go to the website :
http://shop.8devices.com/carambola-bundle
I have seen :
Bundle Carambola + Devboard i think it’s this bundle you use ?
What about wifi is it include inside ?
Thanks
MITCHEL, you are correct! It is bundle (devboard with Carambola). And again yes, it has integrated wireless. Even with antenna!
Thanks for your response.
I have bought 2 months ago a Rasberry do you thing it can work too instead of Carambola ?
I will buy a carambola to test !
Raspbery Pi has no wifi. So I recommend using Carambola.
Thanks
Ok i will order it.
I don’t find in your website software application to put in the robot to control it and software to put in the robot ?
I would like to add a servo to move the angle of view of the webcam from bottom on to top.
There is no software for Carambola. It act as gateway. In order to add servo or other functions you need add another ser2net session and use second UART. Then connect arduino or otehr MCU and control your peripheral hardware with it.
How do you control it on the video ?
Do you mean how I control it from Android application?
Yes exactly
Screen is divided into two equal parts – upper and lower. The higher upper part you press (and hold) the faster motors turns. The lower you press the faster motors turns backwards. Turning is performed by tilting tablet. If you release finger rover stops. If you go outside wifi coverage rover also stops.
Can you put screenshot of your android control on your website ?
Thanks
There is not much to see. There is video in the center of lcd. And nothing else. All configuration is inside code (it’s quick and dirty approach).
no need to be clean only to be “plug an play”
Just to understand completly how it work :-)
When you configure it, it’s plug and play :) Read android sources, it is not hard to understand.
ok
but if i want to work on ipad ?
I have no sources for ipad (I don’t have and ipad to test), but you are free to port it yourself.
yes i would like to compare ^^
Hi there. Very nice robot. I’m getting parts for a similar project i wanna build. I will use Tagu wheels like you did, and most probably 75:1 or 99:1 Pololu motors. Those I found on Ebay are not that powerful, can’t find the type of motors you used.
My question is: Are this motors reliable in terms of final axle?? I will add some weight on the robot (5-6Kg). Can the motor axles stand that amount of weight and still run smooth? thanks in advance.
Also, do you have an Ebay link with the exact motors you used? I would be grateful, they’re a lot chipper the Pololu’s
Cristian, these motors will not survive this payload. Don’t use cheap ones if you need reliable performance (gears have tendency to shatter). You should build secondary wheel axis coupled with heavy duty bearings.
Interesting. Might get some ideas for a robot using the ArduFlyer (APM 2.5) board
Hello. Nice project.
I have a question.
1. Youtube video was taken by rover’s cam? It looks HD. But streaming setting is 400×200.
2. How to record this video?
I Would like to making HD live streaming using usb webcam. So I want to know carambola (Actually using usb webcam) can do it?
Hi, Donghee. Thank you.
Video was taken with small camera mounted from behind. Video from Carambola was downsized to gain better performance on my cheap china tablet, it has incredibly bad wifi. If you need to record video with Android device, I can only recommend googling. There are many different examples how to do this on your device.
Can you send a link to builded APK file?
I dont know anything about programming I have only electrical knowledge
And some Bascom never did anything in C
Thanks in advance
Krynin, it is time to start using C :) I don’t have all components by hand, so can’t really help.
I have two questions
Are you planing to build Third version of this rover this year?
and
Is it possible to drive any other controller for this board
My rover is 1.2m long and I’m using 4x500W motors and cant find any motor controller with serial interface
Hi, Krynin. I don’t have plans of building next version. Though it would be fun. You can use any cheap microcontroller to act as basic seria/i2c/spi to pwm or better – motion controller with feedbacks from motors.
Nice work! We built a similar project. However, we installed an Android device onto a RC car and used an IOIO board to control it autonomously. Here is the preliminary result:
http://youtu.be/vkvkfcqEUkk
i have similar kind of project.
i want add an application(written by me) in to carambola2’s file-system.
so can you tell me, how i can add my application in Carambola?
thank you.. i like your project and explanation.
Yogesh Dhada, there two ways:
1 – compile your own firmware (package will be included)
2 – copy file to Carambola (via scp, ftp or wget) and install it “apkg install package.apt”
Thanks Saulius Lukse.
i have already suppose to do, but i have some confusion.
can you give me any useful website link for way 1(package will be includeded),i mean information about, add own application(package) in with carambola2
Thanks again for supportive and clear response
Yogesh Dhada, what kind of application and in what form do you have it?
i haven’t build any application,
but my first task is to connect external antenna for long range,
i had connected using u.fl connector..
i want use external antenna instead of internal antenna
now how can configure it, or use it.
Thank you
thank you for your support, i build my own application of helloworld in carambola2.
now please help to configure carambola for external antenna
Changing antenna from ceramic to external might be tricky. Best way is to buy carambola with u.fl connector enabled (small capacitor must be soldered to optional position – just let 8devices know about your needs when buying). Or you can unsolder ceramic antenna and solder external antenna cable. This might be more complicated than you think. If done improper way, antenna can be way less effective than internal one. Both antennas can not operate at the same time and can’t be switched without soldering skills.
If you need to write your own programs, it is best to find goof tutorial about openwrt. Another starting place is 8devices forum and wiki.
is this Pololu Qik 2s12v10 Dual Serial Motor Controller arduino compatible ?
Mohanish, basically everything these days is arduino compatible :) What exactly do you want to know?
Hi, what lattency did you get?
Hi Kuger, I think it was in a range of 0.2 – 0.3s.